How to Make Jerky in a Dehydrator, Step by Step
To make jerky in a dehydrator, slice and season lean meat, heat it to 160°F as USDA advises, then dry it with the dehydrator held at 130 to 140°F. Check the meat with a food thermometer, and read your machine's manual before the first batch.
On this page (10 sections)
- What do you need to make jerky in a dehydrator?
- Step 1: Slice the meat thin and even
- Step 2: Season the strips
- Step 3: Pre-heat the meat to 160°F
- Step 4: Load the trays
- Step 5: Set the temperature and timer
- Step 6: Dry the jerky, then check it cool
- Mistakes to avoid when you make jerky in a dehydrator
- Can you make venison jerky the same way?
- Make your first jerky batch in a dehydrator
This guide shows how to make jerky in a dehydrator in six steps, from slicing to the final check. The heat steps matter most, so each one follows USDA's jerky guidance.
Not sure a dehydrator is the right tool? Can you make jerky in a dehydrator? covers when it fits, and our food dehydrators for jerky guide compares machines by batch size and heat range.
What do you need to make jerky in a dehydrator?
You need lean meat, a sharp knife, a dehydrator with trays, a food thermometer and a seasoning kit or your own blend. The thermometer is the tool people skip, and it's the one USDA's guidance depends on.
Wash your hands, knife and cutting board before and after you handle raw meat. If you marinate, do it in the refrigerator.
A dehydrator that reaches the drying range
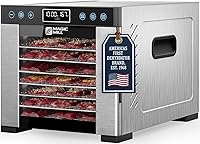
Any dehydrator whose range includes 130 to 140°F will do the job. The Cosori 6-tray runs from 95 to 165°F and the Magic Mill Pro 7-tray runs from 95 to 176°F, so both cover USDA's drying range.
Check the range in your own manual before the first batch. If you're still choosing a machine, our food dehydrators for jerky guide compares trays, size and heat range.
A thermometer for the meat
USDA says to check the meat with a food thermometer, because a dehydrator's air setting doesn't show the meat's temperature. TempPro says its TP19H has a 4.3-inch stainless steel probe and ±0.9°F accuracy.
Step 1: Slice the meat thin and even
Cut the meat into thin, even strips so every piece dries at the same pace. Thick strips take longer and finish after the thin ones in the same batch.
Trim the fat and chill the meat
Trim the visible fat before you slice, since lean meat gives cleaner, more even cuts. Firm, partly frozen meat holds its shape under the blade, which makes thin cuts easier.
Slice with or against the grain
Cutting with the grain gives chewier jerky, and cutting against it gives a more tender bite. Pick one direction for the whole batch, and keep every strip the same thickness.
Step 2: Season the strips
Season the strips with a kit or your own blend, and follow the kit's instructions for any cure. Hi Mountain's Original Blend kit comes with one seasoning packet, one cure packet, a shaker mixing bottle and written instructions.
Hi Mountain says one kit seasons up to 15 pounds of whole muscle meat or up to 10 pounds of ground meat, so match your batch to what the instructions describe.
Use the cure exactly as the kit describes, and don't change the amounts yourself. A homemade blend works too, and the heat steps stay the same.
For more kits, see best jerky seasoning kits for a dehydrator.
Step 3: Pre-heat the meat to 160°F
USDA advises heating the meat to 160°F before the drying step, checked with a food thermometer. Poultry jerky needs 165°F.
Do this even though your dehydrator has its own heat settings. USDA notes that many dehydrator manuals leave the pre-heat out, and that a dehydrator on its own may not reach a temperature that kills bacteria.
Check the thickest strip
Check the thickest strip with the probe before any meat goes on a tray, and keep checking until it reads 160°F. The USDA jerky and food safety page lays out the full guidance.
Step 4: Load the trays
Lay the strips in a single layer with a little space between them, so air can reach every side. Pieces that touch block the airflow and dry more slowly.
Check what came in the box
Mesh screens suit small pieces and fruit roll sheets suit fruit leather, so look at what your dehydrator includes. The Cosori 6-tray comes with six dishwasher-safe stainless steel trays, one mesh screen, one fruit roll sheet and a 50-recipe cookbook.
Step 5: Set the temperature and timer
Set the dehydrator to a number between 130 and 140°F for the drying stage, then set the timer to mark the cycle. Our dehydrator temperature for beef jerky guide covers the heat plan in more detail.
Pick a control that moves in small steps
A control with 1-degree steps lets you set an exact number inside USDA's range. The Magic Mill Pro 7-tray moves in 1-degree steps from 95 to 176°F, and its timer runs up to 48 hours in 30-minute steps.
Keep the door shut
Opening the unit over and over lets warm air out, so trust a steady setting over frequent peeks. Magic Mill says the rear fan on its Pro 7-tray moves air across every tray without tray rotation, so there's no need to open it to swap trays.
Step 6: Dry the jerky, then check it cool
Take a few strips from different trays and let them cool before you judge them, because warm jerky feels softer than it will once it cools. Cooled jerky should feel dry and firm, not tacky.
What changes jerky drying time in a dehydrator
Thickness, humidity, how full the trays are and the machine itself all change how long a batch takes. How long does it take to make jerky in a dehydrator? explains how to plan the timing.
If a few strips are still soft or tacky after they cool, put them back and check again later. The finished ones can come out while the rest keep drying.
Clean up after the batch
Wash the knife, cutting board and trays once the batch is out. Cosori says the six trays on its 6-tray are dishwasher safe.
Mistakes to avoid when you make jerky in a dehydrator
The three most common mistakes are skipping the pre-heat, crowding the trays and trusting the clock over the thermometer.
Skipping the pre-heat
A high setting on the machine doesn't replace the pre-heat. USDA includes the step because a dehydrator on its own may not reach a temperature that kills bacteria.
Crowded trays and mixed thicknesses
Strips that touch dry slowly, and strips of different thickness finish at different times. Leave space, group similar strips on a tray and run a second round if the batch is too big.
Judging the meat by color or the clock
Color and time don't show the meat's temperature. Keep the thermometer next to the cutting board so the check takes seconds.
Can you make venison jerky the same way?
Yes, venison jerky follows the same routine of slice, season, pre-heat, load and dry. USDA's jerky guidance applies to jerky made from meat, so the same heat steps cover deer strips.
For the kitchen side of game meat, read deer jerky in a dehydrator. If you're picking a machine for it, how to choose a dehydrator for deer meat covers what to check before you buy.
Make your first jerky batch in a dehydrator
Start with a small batch so you can learn how your machine paces the drying, then scale up. Write down the thickness, the setting and the probe reading each time.
When you want a shortlist of machines, best dehydrators for jerky compares them by specs and features. More plain how-tos live in the jerky dehydrators category.
Frequently asked questions
How do you make jerky in a dehydrator?
Slice lean meat thin and even, season it, then heat it to 160°F as USDA advises, checked with a food thermometer. Lay the strips on the trays in one layer and dry them with the dehydrator held at 130 to 140°F, then judge them by feel once they cool.
Do you have to pre-heat meat before using a dehydrator?
Yes, USDA's jerky guidance includes a pre-heat step, and the meat should reach 160°F, confirmed with a food thermometer, before the drying step. USDA notes that many dehydrator manuals leave this step out, so read the guidance before your first batch.
What do you need to make jerky in a dehydrator?
You need lean meat, a sharp knife, a dehydrator with trays, a food thermometer and a seasoning kit or your own blend. The manual that came with your dehydrator covers its own steps, and the thermometer is what confirms USDA's 160°F pre-heat.
Can you make jerky without a seasoning kit?
Yes, a homemade blend works too, and the slicing, pre-heat and drying steps stay exactly the same. A kit is a shortcut for flavor, not a way around the heat rules, so check the meat's temperature before drying whichever seasoning you choose.